


1. Overview
For production workloads running in a private network, that need to be exposed to the end users over a VPN, using a managed VPN service from a public cloud / hyperscaler (e.g. AWS, Azure and GCP) of your choice makes sense. A managed VPN service is a production grade service like any other managed service offered by a hyperscaler. It means it provides auto upgrade/patching and is designed for high availability, scalability, fault tolerance etc. However, all these come at a cost of complex pricing and the complexity involved in operating managed services for a production environment.
When it comes to exposing development environments to the developers over a VPN, one may prefer a VPN solution that is free and easy to install/configure/upgrade even for developers and software/cloud architects. This was my requirement when I decided to manage around half a dozen single-node Kubernetes clusters to take advantage of shared remote development environments.
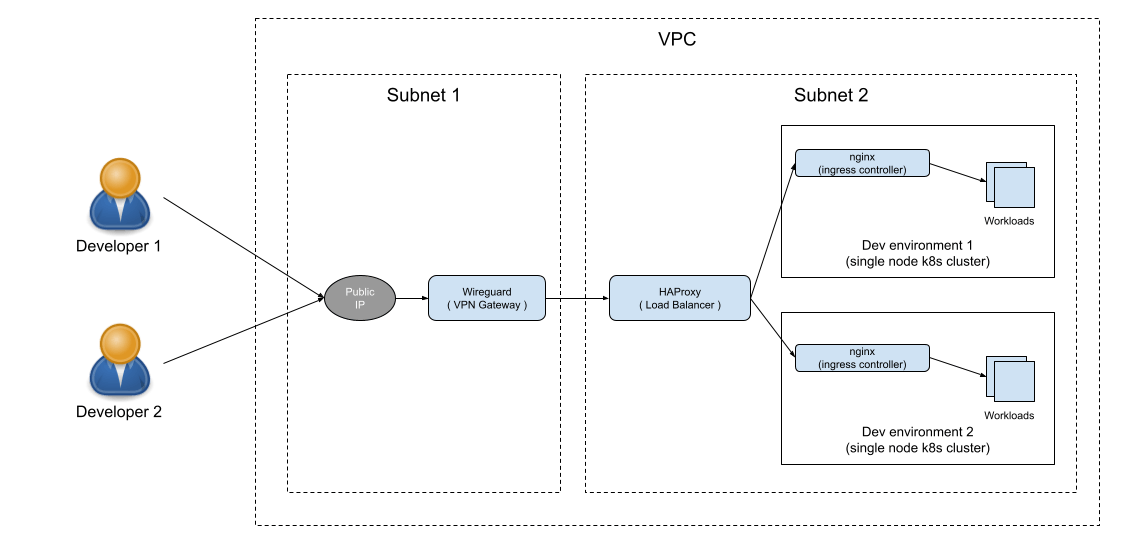
This setup not only improved the productivity of my team significantly by leveraging some Kubernetes features (e.g. hostpath) which are not enabled in managed Kubernetes services but also helped me to define a portable setup for our development environments which I was able to migrate from one hyperscaler to another in a very less time saving me precious time and efforts in time consuming and expensive cloud migrations for such environments.
This approach is very useful for those solutions/cloud architects who work for multiple clients running their workloads on different hyperscalers or in a situation where you are running a SaaS application on different hyperscalers because a single hyperscaler is unable to meet all the requirements of your SaaS application for different regions. This is also useful in a situation where you think that your SaaS application can be migrated to a different hyperscaler in the future ( e.g. a startup is already spending a huge amount of money on a hyperscaler but now wants to reduce it by moving to a different hyperscaler due to various reasons (e.g. ongoing funding winter, incentives offered by the hyperscaler etc)).
When I started looking for a self-hosted VPN solution, OpenVPN is the first which came to my mind. OpenVPN is counted as a golden standard for a self-hosted VPN service. However, I was looking for a VPN solution that can be managed by a cloud architect like me who is not into DevOps. That was the time I came to know about Wireguard and was quite impressed by its simplicity.
2. Steps
2.1 Setting up the WireGuard server
- SSH to ubuntu vm and install
WireGuard-
sudo apt update && sudo apt install -y wireguard
- Enable packet forwarding for IPv4 -
sudo echo net.ipv4.ip_forward=1 >> /etc/sysctl.conf
sudo sysctl -p
- Generate a key pair for the
WireGuardserver -
sudo -i
cd /etc/wireguard
umask 077
wg genkey | tee privatekey | wg pubkey > publickey
Above command will generate two files - privateKey and publicKey in /etc/wireguard folder which we will be using as the private and public keys respectively for the WireGuard VPN server.
Create
/etc/wireguard/wg0.conffile with the following content -Select an IP range (e.g. 192.168.60.0/24) that is a subset of one of the following private IP ranges -
10.0.0.0/8
172.16.0.0/12
192.168.0.0/16
Use an available IP (e.g. 192.168.60.1) from the selected IP range (e.g. 192.168.60.0/24) and update it against
Addressproperty in below configuration.
[Interface]
PrivateKey = $(cat privatekey) # content of /etc/wireguard/privatekey
Address = <wireguard_server_ip> # Select an available ip (e.g. 192.168.60.1/32) from wg0 interface ip range (e.g 192.168.60.0/24)
ListenPort = 51820 # or specify a different value
PostUp = iptables -A FORWARD -i %i -j ACCEPT; iptables -A FORWARD -o %i -j ACCEPT; iptables -t nat -A POSTROUTING -o ens3 -j MASQUERADE
PostDown = iptables -D FORWARD -i %i -j ACCEPT; iptables -D FORWARD -o %i -j ACCEPT; iptables -t nat -D POSTROUTING -o ens3 -j MASQUERADE
- Bring
wg0interface up using the following command -
sudo wg-quick up wg0
- Enable auto start of
WireGuardserver after starting/rebooting VM -
sudo systemctl enable wg-quick@wg0
2.2 Adding a client to WireGuard server
2.2.1 Client side (e.g. developer machine ) changes
Install
WireGuardclient software using the instructions here for your target operating system.Add an empty tunnel on the
WireGuardclient software. This will generate the following configuration -
[Interface]
PrivateKey = <client_private_key> # auto generated
Above step will also generate a public key for the client. Make a note of it as we will need it in following steps.
- Add additional settings to the above configuration as shown below -
[Interface]
PrivateKey = <client_private_key> # auto generated
Address = <client_ip> # Select an available ip (e.g. 192.168.60.2/32) from wg0 interface ip range (e.g 192.168.60.0/24)

[Peer]
PublicKey = <wireguard_server_public_key>
AllowedIPs = <all_ip_ranges_client_will_access_through_wireguard_server> # e.g 10.100.1.0/24, 10.100.2.0/24
Endpoint = <wireguard_server_public_ip>:51820 # Update 51820 to a value specified in wg0 configuration file
PersistentKeepalive = 25
2.2.2 Wireguard VPN server changes
- Shutdown wg0 interface -
wg-quick down wg0
- Add client configuration to
/etc/wireguard/wg0.conffile -
[Interface]
PrivateKey = $(cat privatekey)
Address = <wireguard_server_ip> Select an available ip (e.g. 192.168.60.1/32) from wg0 interface ip range (e.g 192.168.60.0/24)
ListenPort = 51820 # or specify a different value
PostUp = iptables -A FORWARD -i %i -j ACCEPT; iptables -A FORWARD -o %i -j ACCEPT; iptables -t nat -A POSTROUTING -o ens3 -j MASQUERADE
PostDown = iptables -D FORWARD -i %i -j ACCEPT; iptables -D FORWARD -o %i -j ACCEPT; iptables -t nat -D POSTROUTING -o ens3 -j MASQUERADE

[Peer]
PublicKey = <client_public_key> # This was generated in second step of 1.2.1 section
AllowedIPs = <client_ip> # this will be the same value (e.g. 192.168.60.2/32) as specified against 'Address' parameter in client configuration file
- Bring wg0 interface up -
wg-quick up wg0